Saturday, June 29, 2013

Geometric Bright Pastels

I was stumped on what to do on my nails yesterday, but I stumbled upon this post by Spektor's Nails and was instantly inspired to re-create it!  Have a look.  :)


I opted to use different colours for a slightly different look.  I started by laying down two coats of OPI My Vampire Is Buff (really - what else? I just bought a back-up bottle of this...) and a coat of Seche Vite to speed up the drying.  


One movie later (Galaxy Quest, if you're curious - very weird movie) I lay down some strips of tape in triangular geometric patterns.  I filled the inner triangles with piCture pOlish Peaches n' Cream, and the outer bits with piCture pOlish Honey Dew.  I love both these super-bright-pastel polishes, but they're such a pain in the butt to photograph!  The following upside-down photo is most colour-accurate, but still not as bright as in person.


It's all topped off with two coats of Seche Vite, which unfortunately shrunk the OPI base and caused major tipwear and a couple chips in just a day of wear.  It's a shame, I really liked this mani! 


What do you think of this look?  Sound off in the comments!  :)

Tuesday, June 25, 2013

Ferb, I Know What We're Gonna Do Today!

Aren't you a little old to like Phineas & Ferb?  Why yes, yes I am.  


Does that stop me from buying  polish named after the show, and painting Perry the Platypus on my nail?  No, it most certainly does not. 

Thursday, June 20, 2013

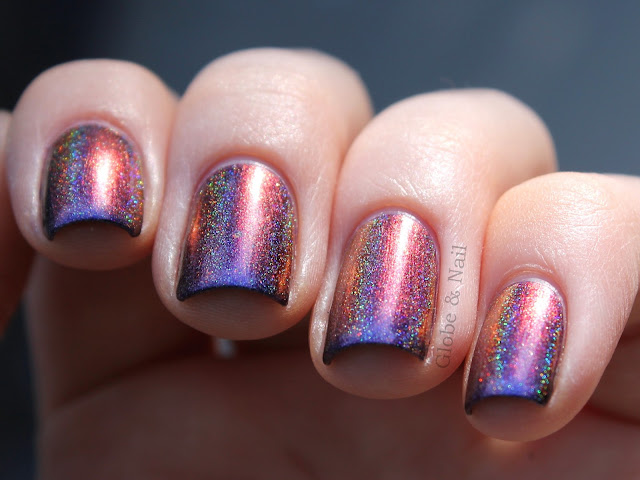
Enchanted Polish: Time To Pretend

It's the last week of school and things are pretty crazy around here, but I've got a quick post today.  This is my very first Enchanted Polish, which I managed to snag from the restock at Nail Polish Canada !  :D 


I hadn't done any research before the restock as to which polishes I wanted, probably because I didn't know it was happening, haha.  I just happened to stumble upon a Facebook post announcing the restock three minutes before it went live, so I quickly grabbed this beauty and checked out before I could get cart-jacked.  ;)


To preserve my precious bottle, I layered one coat over Dior Purple Revolution (might as well go all-out, right?) and topped it with one coat of Seche Vite, which didn't dull the holo.  

There's TONS of photos, a mix of regularly-lit and outdoors to show the absolutely amazing holo and colour shift.  I'm in love!!


I wore this mani for two whole days, and still didn't want to take it off!  What do you think of this beauty?
Will you be trying to grab any Enchanted Polishes soon?  This was my first, but I think I'm definitely going to have to get more... Uh-oh, down the rabbit hole I go!

Monday, June 17, 2013

Le Bunny Bleu Giveaway

Hi all!  I have a giveaway to help brighten everyone's Monday mornings!  You'll probably remember that earlier this month I did three manis inspired by Le Bunny Bleu, and they've very generously offered to sponsor a giveaway.  One of you will win a $75 give voucher to Le Bunny Bleu for use on any pair of sandals or flats.

Skittle Nail Art, Striped Half-Moons, Bold V-Gap
This giveaway is open internationally to anywhere that Le Bunny Bleu ships; take a look at their shipping and delivery page to make sure it's open to you.  The winner will be emailed by me to be notified (and congratulated!) on their win, and will also be emailed directly by Karimah from Le Bunny Bleu with the gift voucher code.  

This giveaway starts as of today, June 17th, and will close at 12am PST on July 9th (midnight on the 8th, Monday night.)  Winner will be announced on the 9th.  

Entries are all through the Rafflecopter widget below!  :)


a Rafflecopter giveaway


Saturday, June 15, 2013

NCLA Nail Wraps Review: Wax Print

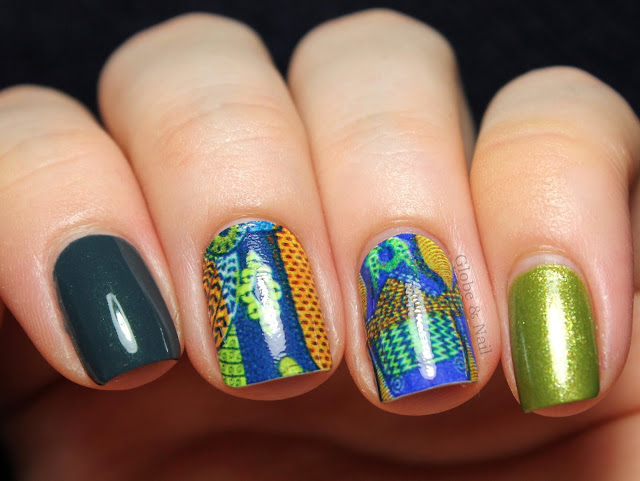
Good morning!  You may remember a while back that I reviewed a set of NCLA Nail Wraps, which you can see here.  I have one more set to show you today, this design is called Wax Print! 

I've been waiting to show you the second set until I could find a time to test the wear, but that idea kind of failed.  My busy life and ridiculous pile of polishes to swatch, along with inability to tolerate having the same thing on my nails for more than two days made that pretty much impossible.  


Since I think that all-over patterns can sometimes be a bit much (and to extend the life of the packages of wraps) I prefer to use them as accent nails.  That's what is what I chose to do with the last set, and I did the same with these to create a cool skittlette mani! 

As with the last set, I wore these wraps for two days with no lifting or any signs of wear.  Following the instructions, I added a top coat to protect them after applying.  Here I've used two coats of Seche Vite.  


I covered all of the application in my previous post, so I'll just paste the same thing here again: 
Along with the wraps, each package comes with a set of instructions and a nail file.  These wraps were very easy to use: choose the size that best fits your nail, peel off, place on your nail, stretch and rub to remove any air bubbles or wrinkles, file off the excess at the edge, and top coat.  The great thing about these is that if you don't get it on the first try, you can quickly remove it and try again.  They were pretty stretchy, and it was super easy to get the completely smooth finish that I've been missing from other brands of wraps.  In case I'm making no sense, ChrissyAi posted a video on applying these wraps


I feel like I do need to address the issue of removal, as several bloggers have mentioned having bad damage to their nails after removing (take a look at this).  When I posted my initial review, I had not read anyone else's yet; I had applied and removed the wraps with no problem so I made no mention of it.  After reading multiple posts on the removal, I paid extra attention this time.  

Since the nail wraps aren't made with real polish, they are supposed to just peel right off which causes damage.  I obviously didn't read this the first time around, because I tried to soak them off anyways, haha!  Good thing, too!  So, as with last time, I doubled up on basecoat, applied the wraps, and added two coats of Seche Vite.  When it came to removal, I soaked them with remover to remove the top coat and loosen up the base coat, and then used an orange stick to gently push the wrap off, starting from the cuticle.  This method of removal probably takes longer than simply peeling, but I'd say it's totally worth it if you're at all invested in the health of your nails.  


My thumbs and index fingers are two coats of Butter London Stag Do, and my pinky is an accent of three coats of Butter London Dosh.  I mixed it up on my right hand with some differently-patterned wraps; I think the one on my right ring finger is my favourite!  Excuse the awkward hand pose... 


NCLA Nail Wraps are now available for purchase through Nail Polish Canada for $16CAD per set of wraps; you can find this specific set here.  To see the whole selection offered by NPC, clicky here.  With 40 individual wraps in one set, you'll get a lot of manis, especially if you use them as accent nails! 

Overall, I really like this set of wraps as well!  The designs are really unique, and the wide variety within the one pack makes them ideal if you're looking for accent nails!  :)   

Disclaimer: The products in this post were sent to me for review. 

Thursday, June 13, 2013

Aphrodite Lacquers: True Love & Broken Hearts Collections

Hi all!  Today I've got two Aphrodite Lacquers to show you; one from the True Love collection (glitter toppers) and one from the Broken Hearts collection (jelly glitters).  I'm no stranger to Rebecca's brand (you can see all my previous posts here) so you know it's a big deal when I say that this post contains what is probably my favourite Aphrodite Lacquer to date!  


Because of that, this post is pretty picture-heavy; continue reading after the jump!  ;)

Tuesday, June 11, 2013

Polish Days: To Boldly Go...

It's that time again, another Polish Days post!  I was super excited about the theme for this month: "To Boldly Go... Whether it's sci-fi or sci-real (yep, I'm going with that terrible wording) it fits the theme for June."  This prompt finally pushed me to do some nail art I've been meaning to do forever...


Source
A tribute to one of my favourite TV shows and subsequent movie, who's cancellation after one season has left a hole in my heart that can only be filled by space cowboys.  A HUGE thank-you to Mishka from Accio Lacquer for helping me make sense of the wibbly-wobbly way of getting gifs into posts!  If you've got any fangirl in you, you need to read her blog.  If not, she has absolutely perfect nails and gorgeous photos too! :D 

And now, to reiterate what Mishka said about the cancellation of Firefly... "Curse you sudden but inevitable betrayal, FOX!"   Picture and gif-heavy, so the rest is after the jump...

Monday, June 10, 2013

piCture pOlish: White Wedding

Hi all!  This morning I have a gorgeous piCture pOlish shade to share with you, White Wedding!  :)


White Wedding is a gorgeous white jelly-ish base filled with light colour-shifting flecks, and was created in collaboration with Llarowe.  Here I've layered two thin coats over OPI My Boyfriend Scales Walls, but I've also worn it built up alone in 3-4 thin coats before. 


Either way, my camera refuses to capture the true beauty of it.   SO frustrating!  I have worn this polish at least three or four times, and my photos never turn out as I'd like.  This is definitely one that you have to see in person, it's so stunning!  


piCture pOlish is available at picturepolish.com.au as well as through lots of other network members around the world. Check out the Network for a full list. 

So... I tried.  But seriously, if you're looking for a lovely flattering white polish with that extra something, White Wedding is the way to go!  What do you think?  :)

Disclaimer: The products in this post were sent to me for review.  

Sunday, June 09, 2013

Lac Attack Spring Fling Collection

Today I've got a new-to-me indie brand to share!  Here's the Spring Fling Collection from Lac Attack.  :)


Picture-heavy; full review and lots of photos after the jump! 

Saturday, June 08, 2013

Shimmer Polish: Part 2

I hope everyone is having a good weekend so far!  It's been a while (read: way too long) since I've had any Shimmer Polish swatches on the blog, but I've got six more glitters for you today!  You can see my previous posts on Shimmer Polish here.  


Super pic-heavy, so read after the jump for full swatches and review!  :)

Friday, June 07, 2013

Le Bunny Bleu - Bold V-Gap

One last Le Bunny Bleu nail art look today!  This post was supposed to be up this morning, but I had so much on my mind last night and forgot to schedule the post... oops.  The nail art contest closed earlier today, and you can see the winning look here.  


I was inspired to do this look while browsing the endless shoe listings on Le Bunny Bleu, and a couple things caught my eye.  I really liked the coral and navy colour combination on this pair, and decided to do a v-gap mani to mimic the adorable toe caps on these shoes!


I started with LaCC 1963, a cute coral shade.  After that was dry (which was very quick - those LaCC polishes dry lightning-fast!) I taped off my v-gaps and added piCture pOlish Electric Blue (which you can see swatched alone here.)  


On my accent nail, I freehanded Le Bunny Bleu's logo with the same two polishes.  It's all topped off with a coat of Seche Vite for a nice smooth shine!  :)


You can find Le Bunny Bleu on Facebook and order from their online store.  They have lots of adorable shoes, I've especially got my eye on some of the oxfords!  The contest is now closed, but you can still see all the entries from the Le Bunny Bleu nail art contest here.   You can see my two previous manis here and here!  Which of my three looks was your favourite?  :) 

Thursday, June 06, 2013

Colors by Llarowe - Holos

I was pondering what to post this morning, when I suddenly remembered that the Colors by Llarowe polishes are launching today and I hadn't shared any of my swatches.  So, what have I got to show you this morning?  Colors by Llarowe holos, of course!! :D


I'm awful at narrowing down photos, so this is pretty picture-heavy.   Trust me, you'll thank me for it.  

Wednesday, June 05, 2013

Le Bunny Bleu - Striped Half-Moons

Good morning!  Today I've got another cute nail art look inspired by Le Bunny Bleu; you can see my previous post here.  Le Bunny Bleu is a shoe company which is currently hosting a nail art competition, you can enter here until this Friday, June 7th.  Take a look!  :) 


Today's look was inspired by this pair of shoes, and the colour combination on this pair.  I started with a base of OPI My Vampire Is Buff, (what else? haha) and freehanded an outline for the half-moons.  Next, I added vertical stripes using (L-R, starting with yellow): SpaRitual Enlightened Soul, piCture pOlish Fairy Floss, piCture pOlish Tiffany, and piCture pOlish Twinkle.  


I finished off the look with some glequins from the Born Pretty Store, and sealed it with a coat of Seche Vite.  


If anyone's curious, on my right hand I did half-moon skittles with one nail in each colour.   The contrast of the bold colours on the right and the mixed stripes on the left was quite fun, and this manicure got a lot of compliments!  :)


You can find Le Bunny Bleu on Facebook and order from their online store.  They have lots of adorable shoes, I've especially got my eye on some of the oxfords!  You can enter the Le Bunny Bleu nail art contest here until Friday, June 7th.  There's not much time left, so get painting!  If you're still in need of ideas, keep an eye out for one more Le Bunny Bleu-inspired look I'll have posted within the next few days!  ;)

Tuesday, June 04, 2013

Nailz Craze Stamping Plate Review - NC02

As promised, here is part two of yesterday's post!  Yesterday I showed you two manis that I did with the Nailz Craze stamping plate NC01, and today I've got two manis to share using NC02!  :)


Monday, June 03, 2013

Nailz Craze Stamping Plate Review - NC01

I've been sick for a couple days now (just a cold - no worries) so I haven't gotten much done.  I did, however, get a chance to play around with a couple Nailz Craze stamping plates!  Today I've got two manicures to show you using plate NC01, and tomorrow I'll show you some looks using NC02.  :)


Saturday, June 01, 2013

Le Bunny Bleu - Skittle Nail Art

I was recently contacted by the shoe company Le Bunny Bleu and asked to create some nail art to help spread the word about their nail art contest!  I'll have three different looks to show you over the next few days to help get the creative juices flowing; the contest is open for entries until Friday, June 7th.  Take a look! 

This skittle nail art was inspired by the brand's logo, and the overall theme of blue on the website.  :) 


My ring finger is the brand's bunny logo, hand-painted over OPI My Vampire Is Buff with Nails Inc. Baker Street.  The same two colours were used on my thumb, and I used the end of a toothpick to make the small polka-dots.  


My index finger is a gradient with OPI Can't Find My Czechbook and Nails Inc. Baker Street.  My middle finger is a tape mani with OPI My Vampire Is Buff and Can't Find My Czechbook.   You can find great tutorials for gradients here, and striping tape here, both over at The Nailasaurus.


The icing on the cake is my pinky nail: LaCC 1976 topped with two coats of the appropriately-named glitter topper LacAttack Bunny Poop (swatches & review coming soon.)  All nails are finished with one coat of LaCC 2013 top coat, followed by one coat of Seche Vite for a glassy look.  :)


You can find Le Bunny Bleu on Facebook and order from their online store.  They have lots of adorable shoes, I've especially got my eye on some of the oxfords!  You can enter the Le Bunny Bleu nail art contest here until Friday, June 7th.  Get working on those manis, and stay tuned for two more nail art looks!  ;)

LinkWithin

Related Posts Plugin for WordPress, Blogger...