Showing posts with label Picture Polish. Show all posts

Saturday, December 27, 2014

Christmas Day Mani

Hello!  I hope that everyone who celebrated had a great Christmas!  My day was alright; it was my first year not being able to spend Christmas with my family, so it was a bit sad.  We did have a get-together with a few friends which was nice, but it just isn't the same as being at home.  However, those of you who follow me on IG (@emmaclarem) will know that I adopted my first-ever pet just over a week ago, which has definitely been keeping my spirits and excitement up.  I got a little 11-month-old boy tuxedo cat; he's such a cutie, and a total lap cat!  I love him to bits!  Anywho, let's get on to what you came here for - the nails!

I was a bit short on time (as always these days) so I decided to re-make my favourite Christmas mani from last year, with a couple little changes. 


My index and thumb started with a base of OPI Live and Let Die, and the rest have a base of Picture Polish Moscow.  My pinky got a coat of WingDust Collections Gilt-y Pleasure, while my thumb (forgot a picture - oops!) got two gold studs.  I added dots in Essie Good as Gold on my index finger, and then stamped with that same gold in the snowflake pattern from BM-323 on the remaining two nails.  All nails are topped off with a coat of Seche Vite.  

I really love the mix of patterns and finishes here; what do you think?  Do you have a favourite nail from this skittlette?  :)  

Wednesday, November 12, 2014

Split Stitches

One of the first orders of business as soon as I got home on Monday was, of course, some nail art!   Having only worn an assortment of three different nude (read: stage-appropriate) polishes over the past three weeks, I was itching to get something exciting on my nails again!  

On the car ride home I was browsing IG for some inspiration, and decided to try this mani by Pshiiit on my own nails.  


I started with two coats of LVX Fantom on all nails.  Once that was dry, I taped off the middle sections and painted one side of each nail with Picture Polish Bonkers, and the other side with Picture Polish Camo.  The last step was to freehand on the lines, for which I used black acrylic paint.  The whole look is topped off with a coat of Seche Vite.    


The best part about these is that the lines don't have to look super neat, so even though the finished look appears to have quite a bit of time invested in it, this was actually a pretty quick mani to do! :)

Monday, August 25, 2014

Picture Polish Blog Fest 2014

I'm really squeezing this post in here, with less than four hours of Blog Fest day left (in my time zone)!  I only got back from England on Saturday, and by the time I did both my Blog Fest manis on Sunday, it was too dark to take photos.  So I took photos this morning before running out of the house for my first day of work as a paid professional dancer (yay!!), and here we are now.  

For this year's Blog Fest, we were to swatch one selected polish, and do nail nail with the other two shades and a set of Nail Vinyls that was included.  

Let's start with the swatch!  I was sent Pandora, which is a new shade that Picture Polish has just released.  It is an amazing royal purple shade with the signature Picture Polish scattered holo finish which I adore. 


 Of course the holo effect is just stunning in the sun, and when you join that with the fact that this is my favourite shade of purple, it's no surprise that this is a huge winner for me!  Shown is three thin coats with LaCC 2013 top coat, although you could definitely get away with two slightly thicker coats in person. 


The two shades that I was sent for the nail art mani are Swagger and Bonkers, and I got the straight Nail Vinyls to use.  The rules were very restrictive in that we weren't allowed to use any other nail art techniques such as gradients or dots, so I had quite a hard time coming up with something interesting. I ended up just making it up as I went, but in the end, I was pretty happy with how it turned out!  


We were allowed to use white or black polish if needed, so I included white for a bit more contrast between the different shades.  The white I used was LVX Fantom.  I can also tell you that Swagger is a two-coater, and that Bonkers is amazingly opaque in just one coat if you're careful!  The whole look is topped with one coat of Seche Vite, although there are quite a few layers of top coat in between there, since I did multiple layers of taping.  


Picture Polish is available online, and you can find a list of international stockists here.  You can also follow the brand on Facebook and Instagram for updates.  Picture Polish also just recently started stocking a special 4-pack of Nail Vinyls, which you can find here.  You can also purchase Nail Vinyls online, and follow the brand on Facebook and Instagram. 

I've really enjoyed seeing what other bloggers have come up with today, since it was quite a challenge in terms of nail art this year!  Well done, everyone!  :)

Disclaimer: The products in this post were sent to me for the purpose of Picture Polish Blog Fest 2014. 

Wednesday, July 16, 2014

Fairy Floss & Halo Skittlette

I've mostly been sticking to plain manis the past couple weeks as I adjusted to a new schedule, but when I saw this skittlette by Marta at Chit Chat Nails I knew I had to recreate it for myself!  

I did make a couple small adjustments to Marta's version, but her mix of colours and finishes was what inspired me most.  :)


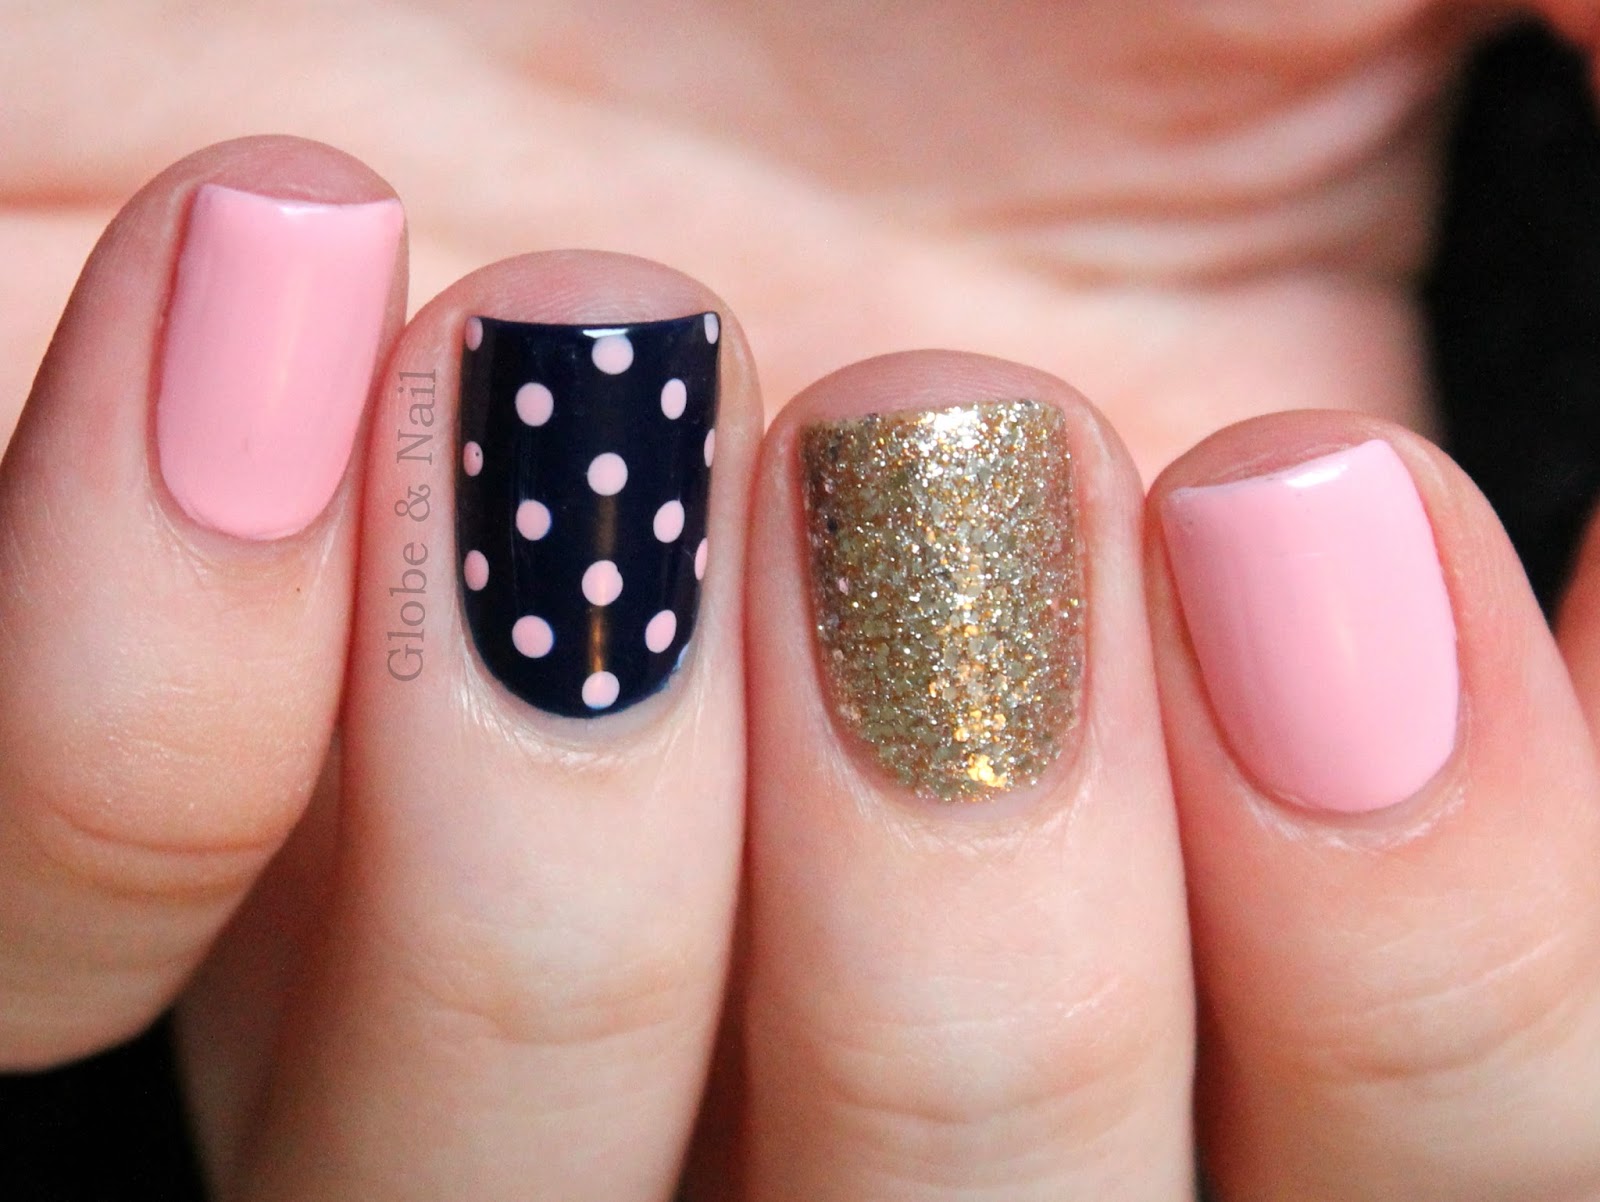
For the pink nails I painted three thin coats of piCture pOlish Fairy Floss, and the gold glitter is three thin coats of Orly Halo.  The navy is two coats of Cult Nails Time Traveller dotted with Fairy Floss, and the glitter gradient on my thumb was just painted with the bottle brush.  All nails are topped with a coat of Seche Vite.  


Marta always manages to put together the most interesting skittlette combinations, I wish I had the same gift!  Don't forget to check our her original version here.  What do you think of this mani?  :)

Monday, May 26, 2014

Floral Sky

I happened to purchase Essie Haute as Hello on the same day that piCture pOlish Sky arrived in the mail, and I knew the two would look great together! 


I started by painting all my nails with three thin coats of piCture pOlish Sky.  The floral nail was inspired by this mani by @lifeisbetterpolished on IG.  The darker outlines are Essie Haute as Hello, and the lighter shade is the same polish mixed with a bit of white.  The leaves are LaCC 1963 and Essie First Timer.  One coat of Seche Vite to smooth everything out! 

I posted a swatch of Haute as Hello on IG, which you can see here.


I really loved how bright and fun this simple mani was, I wore it for four days!!  What do you think? :)

Friday, May 16, 2014

Lucie in the Sky with Diamonds

Shortly after receiving piCture pOlish Sky in the mail last week, it dawned on me that I now owned polishes called Sky and Lucie (close enough, haha!)  I couldn't resist the opportunity to use the names as inspiration for some diamond nail art!  ;)


The bases on all blue nails is three thin coats of piCture pOlish Sky, my index finger is two coats of piCture pOlish Black.  I freehanded diamonds on my two accent nails using acrylic paint and Essie No Place Like Chrome, and added a silver rhinestone to my index finger.  My pinky is a glitter gradient with Shimmer Polish Lucie.  All nails are topped with two coats of Seche Vite.  


I was a little worried about freehanding the diamonds, but I think they turned out super cute; I also love the graphic contrast that the black nail provides!  What do you think of this mani?  :)

Monday, May 05, 2014

Born Pretty Store Review: Fox 3D Charm

I've got another nail art product to share with you today; it's this super cute fox 3D charm which you can find here, #162.  


I started this mani with three thin coats of piCture pOlish Honey Dew, one of my absolute favourite polishes for spring and summer.  I attached the 3D charm with a dollop of Seche Vite as I was just wearing it for an evening out, however if I was planning on wearing it for longer I would have secured it with a dot of nail glue.  I felt as though my other nails needed a little something more, so I added silver rhinestones from a Sally Hansen I <3 Nail Art kit.  


Unfortunately the charm isn't curved so the edges do stick out quite a bit, but the little fox is just so cute that I'm willing to put up with that!  :P 


You can purchase this charm through Born Pretty Store here.  Use the code PPJ61 to get 10% off your entire order!  Are you as in love with this little fox charm as I am?  :)

Products in this post were provided for review and my honest opinion. 

Saturday, February 22, 2014

Floral Pirouette

Last Friday I received a huge dump of mail all at once - a Valentine's Day package from my family which was a lovely surprise, some boring forms from my dad to do with my EU citizenship application, two new polishes to review from Candeo Colors, and my order of piCture pOlish Pirouette from Nail Polish Canada!  It's not hard to guess what's featuring in today's post... 


I wasn't in the mood for swatching, but couldn't decide what polish to wear either - so I combined Candeo Colors Night Flight and piCture pOlish Pirouette into this cute floral double-accent mani! 

Pirouette was definitely an impulse buy for me - I knew the particular shade of pink wouldn't be flattering on my skin, but the holo and shimmer was so pretty and come on, it's call Pirouette!!  How is the ballerina in me supposed to resist that?  (And if you're wondering, yes, I have the A England Ballerina Collection in my possession and I will show it to you eventually... Be prepared for a lengthy post including a lesson in the history of ballet!!) 


My index and pinky fingers are wearing two perfect coats of piCture pOlish Pirouette, topped with a coat of Seche Vite.  The dots are Cult Nails Time Traveller, only because the navy I used on the other nails wasn't quite as opaque as I would have liked for dots.  

My two floral nails are two coats of Candeo Colors Night Flight, which I'll have a full swatch and review of here soon (along with one more Candeo Color polish!)  The flowers are mainly Pirouette, with highlighting and shadowing in Essie Fiji and LaCC 1950, respectively.  The leaves are Essie Mojito Madness with highlights in LaCC 1968.  One coat of Seche Vite to finish off those nails as well! 


I really liked this look, and thought it was a nice escape from the all-dark manis I've gravitated towards for the past few months.  Unfortunately the shade of pink in Pirouette doesn't look good on my skin (it's less obvious in photos) but it's just so pretty, and there was no way I could resist that name!  ;)

How do you like this mani?  I'd love to hear what you think, leave a comment!  :)

Monday, January 13, 2014

1999, Recycled & Upgraded

I mentioned in Friday's post  that I'd recycled the black nails from that mani and made an entirely different look, and that's what I'm sharing with you this morning!  


Same as before, the black nails are two perfect coats of LaCC 1999, which has great staying power when sandwiched between LaCC 2012 base coat and 2013 top coat!  To those nails I added some square peach studs from the Born Pretty Store.  


I changed my two accent nails up by putting on three thin coats of piCture pOlish Peaches n' Cream, a favourite spring/summer polish of mine!  The weather's not been very nice, so I was in the mood for something bright!  Those nails are topped with one easy coat of my favourite black and white glitter topper, Different Dimension Social Suicide.  All nails have two coats of LaCC 2013 top coat.


On a side note, what do you think of this different watermark?  I was trying to come up with something that was more unique and incorporated my logo, but I'm not sure if it's readable enough and if the image distracts from the nails.  Let me know what you think!  

Anywho, I much prefer this look to the previous one.  Recycling those nails to use as a starting point for a very different double-accent look was a fun way to quickly change up my mani!  :)

Monday, September 30, 2013

Lines That Go Everywhere

Well, so much for getting all of my summer manis posted this week.  I had planned to schedule a bunch of them to post throughout the week, but that obviously didn't end up happening.  I've been performing all week and have been at classes, rehearsals, and shows every day from 8am to 10:30pm, so as you can imagine, I haven't had much time to post... Nevertheless, I've got a post up for today! 


This is a mani that I threw together sometime in August, when I wanted to try out some different designs with my striping tape.  I started with a base of OPI My Vampire Is Buff, taped off the patterns, and painted over it with piCture pOlish Peaches n' Cream.  To speed up the drying, I added a coat of Seche Vite before topping it with a coat of Essie Matte About You.  


"Who's Section"

Hello there!! So today's nails are "lines that go everywhere" (by the way, I named this)... My favourite one is the ring finger and Emma's favourite is the middle one! These nails reminded me of Penrose Stairs (The Impossible Staircase) for some reason, so I found them very interesting when I saw them in person. I'm also urging Emma to try the staircase on her nails, not sure how she'll do it, but it will be awesome! Goodbye for now!

Wednesday, August 21, 2013

Winstonia Store Review: 3D Nail Art Charm #28

Good morning!  Today I've got a nail art product to share which was a first for me: 3D charms!  


For this mani, I used piCture pOlish Peaches n' Cream and Honey Dew as my base colours.  After a coat of Seche Vite, I glued on the rhinestone bow with a dot of nail glue; it was super easy!  


I decided to stamp polka-dots on the rest of my nails, because they look so cute with the bow!  I stamped in Konad white polish with Born Pretty Store plate m79.  Those nails are also topped with a coat of Seche Vite. 


As you can see, the bow is pretty large and sticks off my nail quite a bit.  However, the bottom is curved to allow it to sit on the nail bed more closely.  Once it was glued on, it actually felt quite sturdy and secure; it lasted for the entire afternoon and evening after applying (even through grocery shopping!) until I loosened the glue with acetone and pried it off before showering.  


As long as you're careful with them, these charms are reusable.  Despite being somewhat impractical for everyday wear, I think that this rhinestone bow makes such a cute addition to a mani for a special occasion!   

You can find this 3D nail art charm on the Winstonia Store here; this is design #28.  I have one more 3D nail art charm to show you too, so keep an eye out for that post *probably* tomorrow morning! 

Have you tried 3D charms on your nails before?  Would you?  Thoughts - let me hear them!  :)  
Disclaimer: The products in this post were sent for review and my honest opinion. 

Monday, July 29, 2013

piCture pOlish Blog Fest 2013: Year of the Blogger

I was so excited when I found out that I was selected to take part in this year's piCture pOlish Blog Fest; it's been so hard to keep it a secret until now!  This year's theme is 'Year of the Blogger', and we were all asked to create a unique nail art look using three piCture pOlish shades provided to us.  It was quite a challenge because we had no say in which polishes we were given, but that's all part of the fun! 
Direct artificial lighting
This post is super picture- and gif-heavy so be sure to read on after the jump for a tutorial!  :)

Thursday, July 18, 2013

Triangular Geometrics & Round Nails

Oh dear, I have round nails!!  They were getting quite long, and I was planning on going back to super-nubs before leaving for a month on Saturday, but I decided to go round for a few days just to give it a go...


I was talking to Alexis while filing them (and freaking out,) and we both agreed that round nails look much better with nail art.  So what did I do?  Nail art it up!! 


Matt Smith is still somehow managing to make it into non-Doctor-Who posts.  My apologies. 


This nail art was initially inspired by this manicure by Alexis, although mine turned out quite differently in the end.  I'm pretty happy with it!  


I started with two thin coats of OPI You're Such A Budapest, freehanded the lines with Essie Good As Gold, and filled in a few of the lines with piCture pOlish Peaches n' Cream over white acrylic paint.  It's all topped off with two coats of Poshé, which I just got my first bottle of over the weekend and LOVE! 


Anywho, while it is an interesting change, I'm still not quite sold on the whole round-nails thing, personally.  I'll definitely be back to my lovely squares within a few days.  What do you all think of the look?  :)

Thursday, July 04, 2013

piCture pOlish: Ruby Blou

Happy 4th of July to all of my American friends!  I've got a very fitting polish to review today, piCture pOlish Ruby Blou!  


This glitter topper is packed with red, blue, and silver hexes and micro-glitters in a clear base.  As undies, I used two coats of OPI My Boyfriend Scales Walls topped with one coat of piCture pOlish White Wedding, which you can see here.  The glitters simply glided onto the nail with no extra effort on my part; the same superior quality I've come to love with all my piCture pOlish shades!  On top is one coat of Seche Vite.  


I've shown this glitter topper once before as part of some nail art, which you can see here.  That time, I paired it with my British, French, and Swiss flags since it matched those colours perfectly.  However, today it's all American!!  


I feel like a bad Canadian posting a July 4th mani while I completely missed out on posting for Canada Day, but I had a community performance that day (at a Canada Day celebration - obviously) and spent the rest of the day with family.  We had a lovely barbecue dinner out on the porch sine June-uary finally decided to get out of here; it' been sweltering these past few days!  


piCture pOlish is available at picturepolish.com.au as well as through lots of other network members around the world. Check out the Network for a full list. 

How do you like this glitter topper?  Did any of you use it for your 4th of July manis?  :)

Disclaimer: The product in this post was sent to me for review and my honest opinion. 

Saturday, June 29, 2013

Geometric Bright Pastels

I was stumped on what to do on my nails yesterday, but I stumbled upon this post by Spektor's Nails and was instantly inspired to re-create it!  Have a look.  :)


I opted to use different colours for a slightly different look.  I started by laying down two coats of OPI My Vampire Is Buff (really - what else? I just bought a back-up bottle of this...) and a coat of Seche Vite to speed up the drying.  


One movie later (Galaxy Quest, if you're curious - very weird movie) I lay down some strips of tape in triangular geometric patterns.  I filled the inner triangles with piCture pOlish Peaches n' Cream, and the outer bits with piCture pOlish Honey Dew.  I love both these super-bright-pastel polishes, but they're such a pain in the butt to photograph!  The following upside-down photo is most colour-accurate, but still not as bright as in person.


It's all topped off with two coats of Seche Vite, which unfortunately shrunk the OPI base and caused major tipwear and a couple chips in just a day of wear.  It's a shame, I really liked this mani! 


What do you think of this look?  Sound off in the comments!  :)

Monday, June 10, 2013

piCture pOlish: White Wedding

Hi all!  This morning I have a gorgeous piCture pOlish shade to share with you, White Wedding!  :)


White Wedding is a gorgeous white jelly-ish base filled with light colour-shifting flecks, and was created in collaboration with Llarowe.  Here I've layered two thin coats over OPI My Boyfriend Scales Walls, but I've also worn it built up alone in 3-4 thin coats before. 


Either way, my camera refuses to capture the true beauty of it.   SO frustrating!  I have worn this polish at least three or four times, and my photos never turn out as I'd like.  This is definitely one that you have to see in person, it's so stunning!  


piCture pOlish is available at picturepolish.com.au as well as through lots of other network members around the world. Check out the Network for a full list. 

So... I tried.  But seriously, if you're looking for a lovely flattering white polish with that extra something, White Wedding is the way to go!  What do you think?  :)

Disclaimer: The products in this post were sent to me for review.  

LinkWithin

Related Posts Plugin for WordPress, Blogger...