Showing posts with label Zoya. Show all posts

Monday, March 17, 2014

Jinx, Sunshine!

Apologies for the week-long break - I've been out of town since last Tuesday on tour with the ballet company performing in Giselle!  I didn't have the time (or foresight) to do up enough posts to schedule through the week, oops... We've still got more shows this weekend, but those are here in town so I should hopefully be able to post a little bit.  
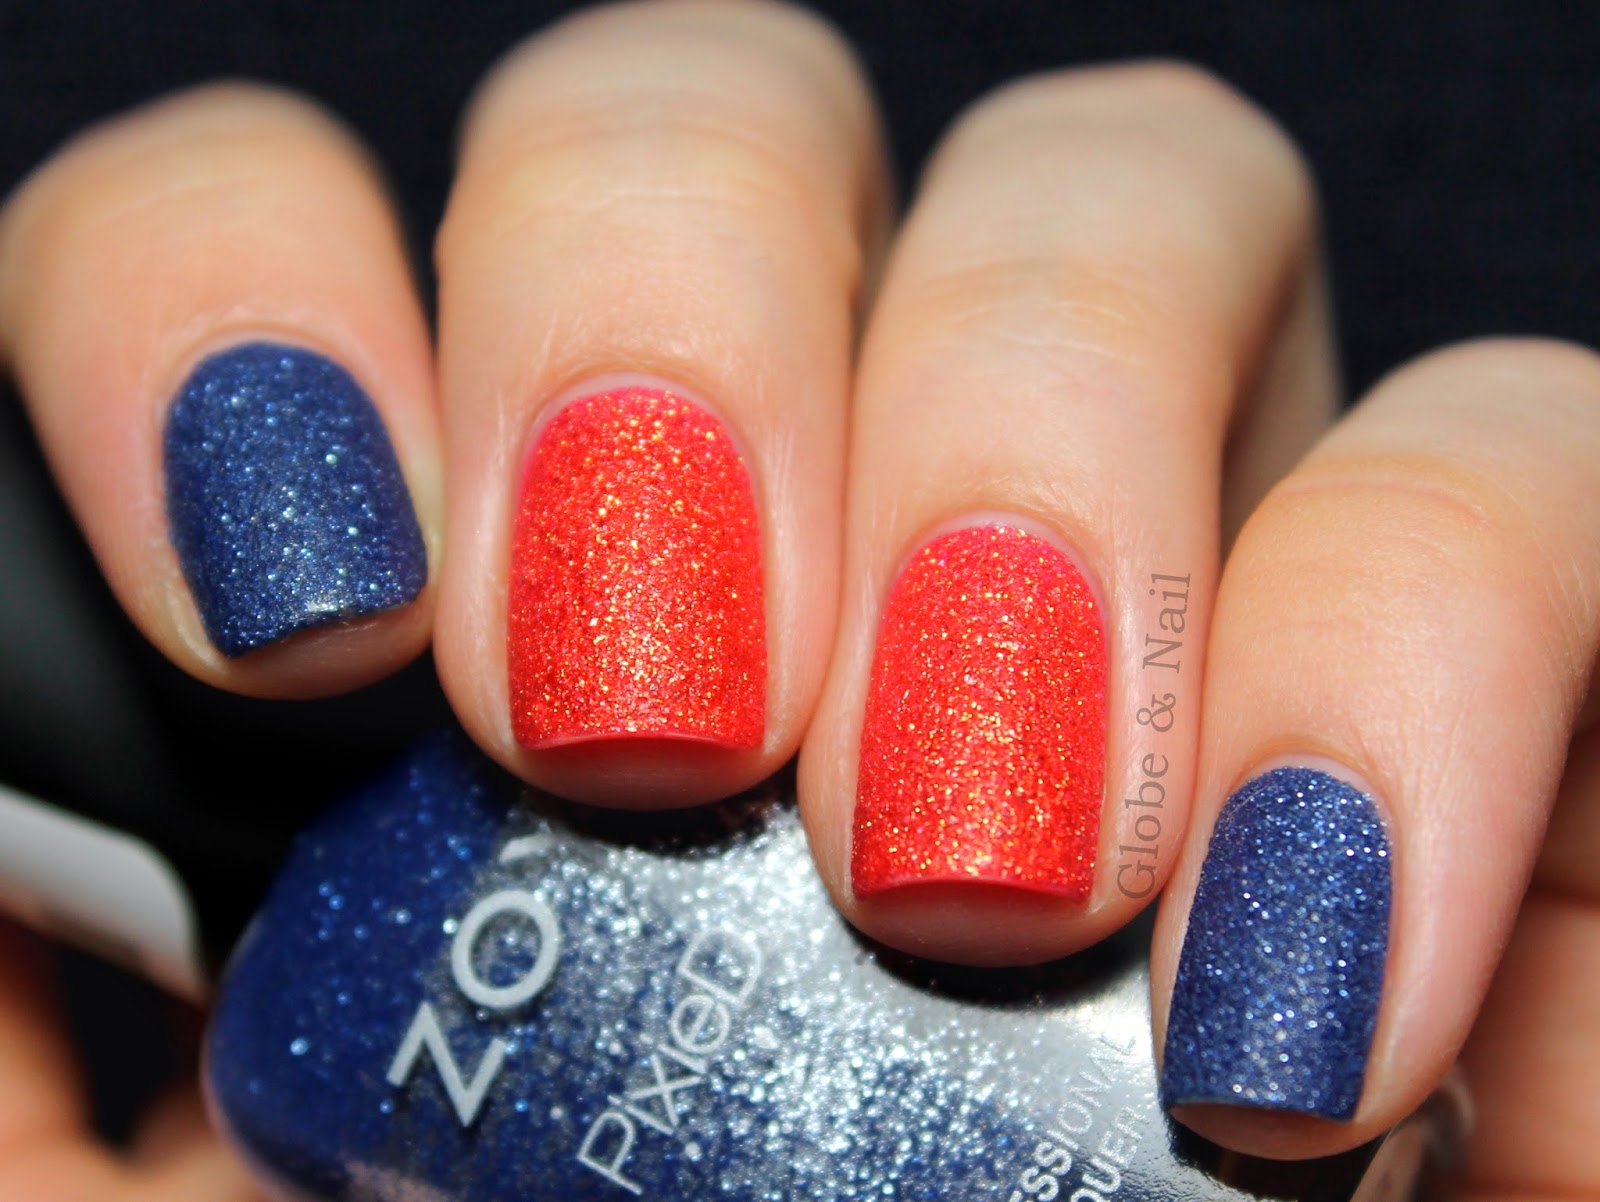

This is a mani I did a few days before I left, when I was in need of something quick and fun.  I used two coats of OPI Jinx on my middle and ring fingers, and I my index and pinky have got one coat each of the amazing Zoya Sunshine.  No top coat obviously, to not ruin the textured finish. 


 These colours together did end up looking a little sports-team-like together (my dad was very proud of my accidental Denver Broncos nails) but blue and orange are complimentary colours, so it made for a fun, bold look!  What do you think?  

Here's hoping the rest of the shows go well this weekend.  I get to go home to my family on Sunday as well for spring break, so it's an exciting week coming up!  :)

Friday, January 10, 2014

Chita & 1999

Happy Friday!!  I'm so ready for the weekend... Anwyho, just a quick post this morning with a double-accent mani I wore a couple days ago.  :)


On my accent nails I used one perfect coat of Zoya Chita, and added three black studs from a Sally Hansen I <3 Nail Art kit using Seche Vite.  I wasn't too impressed with these studs, unfortunately; a lot of them are misshapen around the edges and have little pokey bits, and they stick up from the nail more than I'd like.  Although they did stay on for two whole days, without any top coat to seal them in!  (Didn't want to ruin the textured finish of Chita!)


My other nails are all two effortless coats of LaCC 1999, the most perfect black with a lovely deep shimmer.  Those nails are topped with one coat of LaCC 2013  top coat.  


Honestly, I was kind of indifferent about this mani.  Not that I really didn't like it, but I just wasn't a huge fan.  I love these two polishes individually, though!  What do you think?  


I've recycled the black nails in this mani and switched up the accent nails, so keep an eye out for that post soon!  :)

Saturday, November 16, 2013

Purple Skittlette & Another Year Older

I'm 18 today!  It's weird, it really doesn't feel like it should be this time of year already, and yet somehow it is...  I've still got to go to ballet class and rehearsals this morning and then go to work for six hours in the afternoon, but I'm going out for dinner with two friends later, so that'll give me something to look forward to!  Well, that and eating an entire tub of Ben & Jerry's all by myself... Because everything is calorie-free on your birthday.


This isn't actually what's on my nails today, but it's a cute skittlette that I wore earlier this week.  I really loved this, mainly because it's all purple which is my favourite colour!  :)


The gorgeous glitter on my index finger is two coats of Aphrodite Lacquers Star Crossed Lovers over OPI You're Such A Budapest.   My middle and ring fingers are each one coat of LaCC 1973 stamped with Nailz Craze Plate NC02 and Essie No Place Like Chrome.  I finished off the look with my favourite textured polish on my pinky: Zoya Stevie.  All nails (except the Pixie Dust) are topped with LaCC 2013 top coat.  


Do you love this look as much as I do?  :)

Tuesday, June 04, 2013

Nailz Craze Stamping Plate Review - NC02

As promised, here is part two of yesterday's post!  Yesterday I showed you two manis that I did with the Nailz Craze stamping plate NC01, and today I've got two manis to share using NC02!  :)


Tuesday, May 28, 2013

Liberty & Roses

Today's blog post is just a quick nail art look that I did last week with some of the new polishes I got on our shopping trip in the US last weekend!  :)


I picked up a few of the Zoya Pixie Dust polishes, and I used two coats of Liberty on my index and pinky nails for this mani.  I really love the Pixie Dusts, the texture is much more fine and sparkly than OPI's Liquid Sand polishes!  


My accent nails are wearing a base of OPI My Vampire Is Buff.  The roses started with OPI Can't Find My Czechbook, and I added details with Essie Mesmerise and LaCC 1976; the leaves are LaCC 1968.  


I actually did this exact mani on my mom in shades of purple (with Zoya Stevie) and we both really loved it, which is what spurred me to re-create it in blues!  :) 


Sunday, May 19, 2013

Foil Gradient with Liquid Palisade

Hi!  Today I've got a super cool product to show you; it's called Liquid Palisade, and the premise that it basically acts as painter's tape for your nails!


Liquid Palisade comes in a lip-gloss-sized tube with a small brush.  You paint it on as a liquid, and it quickly dries to a rubbery-latex film that you simply peel off after painting for a speedy clean-up!   


I have actually used this product a few times already, mostly for gradients (like the one in Friday's post) since I love them, but hate the cleanup!  When Sarah from Chalkboard Nails posted this gorgeous foil gradient last week and mentioned the tedious clean-up, I knew that would be the perfect test for this!  


I started with a base of OPI A Woman's Prague-ative, which you can see swatched here.  I then painted the liquid palisade around my nails and let it dry, covering quite a large surface since gradients tend to make a huge mess.  After sponging on my gradient with Zoya Ziv, I peeled off the liquid palisade with a pair of tweezers.  I finished the clean-up with some acetone and a makeup brush, as per usual, but the small amount that I had to do was nowhere near as much as I would have had to clean up, had I not used the liquid palisade! 


There are other uses for liquid palisade too, a few of which you can see in Wacky Laki's post here.  I'm interested to see how it works with watermarbling; imagine how awesome it would be if this worked!!  

Liquid Palisade currently retails here for $22/bottle; it may seem pricey, but one bottle contains enough product for over 50 manicures.   

Honestly, my only problem with this product is that the bottle is super tall and skinny, making it very unstable; I felt like I was going to knock it over every time I dipped the brush in.  Uh-oh!  Luckily there were no casualties, so you'll definitely be hearing about this again from me!   What is your impression of liquid palisade?  Have you tried it yet?  If not, do you plan to?  :)

Disclaimer: The products in this post were sent to me for review and my honest opinion.

Thursday, January 24, 2013

Indie January: Candeo Colors Sweet Sierra

Today's post will be a short one, I'm going out of town to a dance convention this weekend and need to write up four Indie January posts for the days that I'm gone!  (Probably should have done that sooner, but...)

Anywho, today's polish is Candeo Colors Sweet Sierra, a clear base packed with purple matte hexes and squares, small purple and holo hexes, medium pink hexes, and small iridescent hexes. 


I layered one easy coat of Sweet Sierra over Zoya Savita, which I think is the perfect undies.  The pink-toned purple base along with stunning pink shimmer in Savita complimented the pink and purple glitter in Sweet Sierra very nicely.  Two coats of Seche Vite for a smooth finish. 


I wasn't sure of this one in the bottle because I'm not really a fan of pink and purple together (though I like them separately) but the purple definitely dominates in this polish!  


Candeo Colors polishes are available through Llarowe and the Candeo Colors website; keep up to date on Facebook. 

This glitter topper is super sparkly, a must-have for pink and purple glitter lovers!  What do you think?  Will you be picking this one up?  :)


Disclaimer: The products in this post were sent to me for review. 

Wednesday, January 09, 2013

Indie January: CrowsToes Tangled Web

It's Day 9 of Indie January, and today's polish is an awesome glitter topper from CrowsToes!  Tangled Web is a clear base packed with black hexes, bars, and micro glitter, as well as blue duochrome hexes.  


I layered one coat of Tangled Web over two coats of Zoya Dove, and topped with two coats of Seche Vite.  Application required some extra work because it was super thick, so I dabbed it on like I described in this post. 


You're probably aware of my love for black glitter, and I really like the pairing of black and blue instead of the normal black and white!  It gave this really cool almost graffiti look to my nails, I had so many people grab my hand and ask me how I "did" the black, haha!   I find that most nuggles (nail muggles) have some mental block with the concept of matte or black glitter, ("But glitter is sparkly!") 


CrowsToes polish is currently in stock on Llarowe, and follow The Polished Crow's blog for updates.

Black glitter: Yes?  No?  Do you like the different pairing of colours, or prefer the normal black and white?  Comments make me happy!  :) 


Disclaimer: The products in this post were sent to me for review. 

Monday, January 07, 2013

Indie January: CrowsToes Cheshire

It's day 7 of Indie January, which is also my first day back at school and dance after Christmas break.  From here on out, it will really be a challenge to post every day; thank goodness for scheduled posts!  To make this sad Monday a little more cheerful, I've got a stunning glitter topper to show you!  (Castle Mani Mondays  will be suspended for the duration of Indie January.)

CrowsToes Cheshire is a perfect mix of purple, pink, silver holo, and yellow glitters with a few odd large matte magenta hexes thrown in for good measure.  That cat used to creep me out, but I'm in love with this polish!


I dabbed one coat of Cheshire over two coats of Zoya Savita, and they work perfectly together!  This polish is literally packed with glitter, so application was tricky.  To get an even coating of glitter, I started by wiping the brush off to remove as much glitter as I could; I then dipped only the tip of the brush into the polish to grab just a little glitter, held the brush parallel to my nail, and dabbed the glitter on using the whole side of the brush.  I found it much easier to get a perfect even coating of glitter this way without any patchiness or clumpy bits!  However, it still needs at least two coats of top coat (shown here.) 


This polish is so glittery, and it's my favourite colour too!  I love red-toned purples, and I think that Zoya Savita made a perfect canvas for the glitter to shine! (Sparkle?) 


CrowsToes polish is currently in stock on Llarowe, and follow The Polished Crow's blog for updates. 

Are you a fan of this polish?  Did the Cheshire Cat creep you out too when you were younger? Haha! :P


Disclaimer: The products in this post were sent to me for review. 

Tuesday, January 01, 2013

Happy New Year!

I hope you all had a fun New Year's Eve, I know I did!  I have a quick post right now with yesterday's mani,  but as of this afternoon, I'll be starting my full month of indie-only posts!  More on that at the end of this post.  


I spent most of yesterday watching movies with my friend so I didn't want to do anything too fancy that I wouldn't be able to appreciate while sitting in a dark room curled up in a blanket, but I still wanted something festive and glittery.  I saw my untried bottle of Zoya Electra sitting on my desk, and knew it would be perfect!


Because I wanted absolute full coverage, I layered three coats of Zoya Electra over two coats of China Glaze Silver Lining.  The super-fine silver glitter was a perfect base for the bar glitter, giving me full coverage without the appearance of layering.  I was extremely surprised by how easily Electra applied, fantastic!  Two coats of Seche Vite for a smooth finish. 


I enjoyed wearing Electra a lot more than I thought I would, all the holographic bar glitter is absolutely gorgeous when the light hits it!

Now as for my month of indie posts... I've got a ton of untried indie polishes, so each day I'll have a post featuring one new indie polish.  Posting every day will be a challenge for me (and require more planning than my usual  "I'll post when I have something new") but I'm really looking forward to it!  I hope you'll join me on my blog this month, though your wallets will probably hate me by the end of it!  :)

Monday, November 12, 2012

Swan Song

So I'm a little late on today's Castle Mani Monday post (seeing as I've just finished watching tonight's episode) but I've got a quick post! 


I'd like to put it out there that I'm going to be keeping these manis pretty abstract in the interpretation so that they can be enjoyed by everyone.  Since last week's post was inspired by Beckett's look, today's mani was loosely based off of one of Castle's looks in tonight's episode. 

Nathan Fillion as Richard Castle

I started with a base of Zoya Dove, placed stiping tape in a line down the center, and painted over with Orly Decoded before removing the tape and adding a top coat (which apparently didn't do much good since it got all scratched up right afterwards).


I haven't been doing my nails as often as I'd like the past couple of weeks because I'm swamped with rehearsals for a big performance that's this weekend (that plus the fact that I'm almost done reading The Hunger Games series and I only started 3 days ago.)  My birthday is this coming Friday (the 16th), and I'm having trouble deciding what I want to wear on my nails!  I'm thinking of re-creating one of my favourite previous manis in different colours, so let me know if you have any suggestions!  :)


Thursday, November 08, 2012

Grey Ombré

I'm sitting here trying to come up with some clever name for this like my Grey-dient.  Grey-bré?  Om-grey? Yea, not really working for me.


This was my first time trying ombré nails, and I really like it!  I've been sick for two days now (though I still have to go to dance - can't miss any rehearsals with the show coming up next Saturday!) and even though it was late last night, I had already been wearing my last manicure for three days and it was getting pretty chipped.  I wanted something fast and easy that was still more interesting than a plain mani, so I finally decided to try this. 


From thumb to pinky I used Sally Hansen Black Out, Orly Shockwave, Grey franken (2 parts Zoya Dove, 1 part Orly Shockwave), Zoya Dove, and OPI My Boyfriend Scales Walls. 


I like the look of the colours transitioning from one to the next across the fingers!  I was a little nervous about having to mix a colour for the middle finger, but I think it came out just right.  I actually ended up liking the colour so much that I might make myself a mini bottle of it! 


I also went a little crazy with the nail file last night, they feel like such nubs after how long they've been the past few weeks!  Oops! 

I'm working on collecting some stuff for a giveaway soon, because lots of exciting events have all seemed to converge!  I just passed 300 blog followers, I'm getting close to 5000 Instagram followers (@emmaclarem), my next post will be number 100, and it's my 17th birthday next Friday, November 16th!  :)


Monday, October 08, 2012

Reciprocal Gradient Tutorial

As promised, here is a step-by-step picture tutorial of my Reciprocal Gradient nails from yesterday's post.  Here is what the finished mani looks like:


For this look I used Zoya Dove and Orly Decoded, though I'm sure it would look great in a lot of other colours combinations too!   Please excuse the the less-than-desirable lighting in the tutorial, it was nighttime and I had to use artificial light (I seriously need to make a lightbox) but I figured you'd rather have a funny-coloured tutorial than none at all! 


1.  Begin with a base coat, and paint your nails the lighter of the two colours you've chosen.  
2.  Sponge on a gradient, I use this method. (Skip to 2:10)  Add a quick-drying top coat.  
3.  Place pieces of striping tape (or very thinly cut pieces of normal tape, if you have no striping tape and a lot of patience.)
4.  Sponge on another gradient using the same method, but this time reverse the colours.  So if your gradient was going light-to-dark before, now sponge on dark-to-light.  You may have to go over this one a couple of times to completely cover the gradient underneath.  
5.  (not shown)  Peel off the striping tape, and clean around your nails, first with q-tips and then with a makeup brush dipped in acetone. 
6.  Add a couple coats of your favourite quick-drying top coat for a nice smooth finish, and you're done! 


How do you like it?  Was it easy enough to understand?  Will you be trying this?  If you write a post about it, please link back to this post.  If you do try it, email a link or a picture to ecm.dancer@gmail.com.  I'd love to see!  :)


Sunday, October 07, 2012

Reciprocal Gradient

I've had this idea floating around in my head for a while, and I don't *think* anyone else has done it before, so I decided to give it a go.  I'm SO happy with how this turned out!  

I started by painting my nails in a Grey-dient with Zoya Dove and Orly Shockwave.  Unsure of how my idea would turn out (regardless of the fact that it looked awesome in my head) I decided to do only my thumb, and if it looked awful I would leave the rest as plain gradients.  At that point I was almost wishing my idea would look awful, nearing 10:30pm, just so I could go to bed sooner...  

Unfortunately, after finishing my thumb, my exact thoughts were "Oh crap, this looks awesome.  Now I'm going to have to do all 10 nails." *facepalm*  Take a look. 


Zoya Dove and Orly Shockwave, with two coats of Seche Vite.  I consistently have problems with these two greys photographing way more blue than they actually are.  Grrr.  


I felt so cool naming this the reciprocal gradient.  I was thinking about nail polish while doing math (I promise that doesn't happen all the time,) and the word popped out at me and it just seemed to fit perfectly  :)


So, since I'm hoping that you'll all love this and want it on your own nails (and then it'll blow up and become a huge trend... Ha. Right.) I took a couple pictures as I was going and I'll post a step-by-step picture tutorial tomorrow!  Awesome nails for all!! 

So you've probably got it figured out that I think this is awesome, but what about you?  Do you like the reciprocal gradient?  Will you be putting it on your (probably lengthy) to-do list of manicures?  Remember to check back tomorrow for a tutorial, and if you re-create the look shoot me an email (ecm.dancer@gmail.com) I'd love to see!  :)

Monday, September 24, 2012

After The Storm

Shut the front door!  It's finally here!  I've been waiting for this day for four months.  Four maddening, challenging, frustrating months.  If you're a fellow Caskett shipper, you'll understand my major freak-outs and random outbursts of excitement today.  Just in case (God forbid) you don't watch Castle, this is the premise of the show.  Seriously, if we thought the end of Season 4 exploded the internet, just wait until tonight.  I'm sure the entire fandom will be lying in pieces on the floor being all like "TOO MANY FEEEELS!"  


Yes, I'm crazy.  Anyways, down to business.  This manicure, in honor of the Castle Season 5 Premiere episode tonight, was inspired by this manicure by Colores de Carol.  I used Zoya Dove and BM-303 and BM-311 with Konad black polish.  Unofrtunately none of my limited amount of red polish worked well for stamping, so black lips will have to do. 


I saw the inspiration for this manicure when she originally did the post a while ago and had it filed away for this day.  It's so perfect for Castle and Beckett, especially considering where they are now.  ;)  


I'm considering doing a series of Monday Castle-inspired nail art posts for next few weeks, so keep an eye out for those because I've got a couple more ideas floating around in my head that'll hopefully make it to my nails. You can see my Castle Season 4 Finale mani here.  Feed the birds! 

I'm so glad that it's finally September 24th.  You seriously have no idea.  But if you do, please leave a comment so I know who you are and we can fangirl together.  

Thursday, September 13, 2012

Grey-dient

Puns aside, here's a fall-appropriate gradient that I'm absolutely loving!  I started with two coats of Orly Decoded, (swatches soon) and sponged on Zoya Dove. 


I didn't realize until after I was done, but I did the opposite of what I normally do for gradients.  Instead of starting with a lighter colour and sponging on the darker, I started with the dark and sponged on the light.  I guess that Dove was opaque enough, because it obviously worked alright. :P


The colours are showing up really blue in my pictures, but in person they are both true grey colours and blend together beautifully.


Hate to toot my own whistle, but I felt like a freaking genius when I thought of this grey-dient thing.  Not gonna lie.  (Super awkward for me if its been done before and I didn't know...)


Anywho, I've also done some layering over this which looks super awesome, but you'll have to wait for another post for that ;) 

Recently we've been seeing gradients done more often in pastel and bright colours, but how do you like the gradient with more muted fall colours? :)

Tuesday, July 03, 2012

Peter Pan Collars

Hello :) I hope you're all having a good day.  I got really excited this morning when I went to check the mail and there were THREE packages; I thought it was all the overdue nail mail I've been expecting!! Needless to say I was extremely disappointed when it turns out there were two packages of junk mail for my grandpa ("I don't know why they keep sending me this stuff!?!") and my sister's order from Etsy which is probably some Harry-Potter-related piece of clothing.   

Anywho, here's the nails I've been wearing the past two days.  I took photos after I did them, but the lighting was god-awful, so I re-did a few of them this morning.  Please excuse the two-day wear.  

I did this mani following this tutorial from The Beauty Department.  Black is Sally Hansen Xtreme Wear Black Out, white and yellow are acrylic paint.  Two coats of Seche Vite, as usual.  The first time I did this was actually before I started blogging and was only posting my pictures to Instagram (@emmaclarem).  That picture is at the bottom of the post... proceed with caution. 


Here we go...


Yea... those were my nails before I started blogging.  Not even gonna make that photo the same size as the others.  Ew.  Sorry you had to see that :P

Also, I did my mom's nails the other day.  I never really do anybody else's nails because they usually don't turn out as good, but I thought of this and had to try it right away, and my sister's nails were already painted. This is a gradient with Sally Hansen Xtreme Wear Lacey Lilac and Zoya Savita, topped with scattered holo-ish microglitter from an unnamed brand.  Pretty, right? 


You may have noticed that I've added a Born Pretty Store coupon in my sidebar; I've got some stuff coming up with their products, so feel free to use the coupon code for 7% off your order!

And don't forget to enter my 100 Follower Giveaway! :)

LinkWithin

Related Posts Plugin for WordPress, Blogger...